


Getting started with TypeScript from just a JavaScript background can be a little bit tasking because the flexibility that vanilla JavaScript gives is no longer there.
The core benefit of TypeScript is that it helps in the early detection of errors. That is, we can detect errors during code compilation. It also helps us to predict how our code behaves with no surprises. Here, you know the type of data you are working with and perform valid operations with that effectively, then return valid typed data that someone else can work with. That is cool, right?
Now, we will be setting up a node application with express using TypeScript. I experienced a lot of challenges while setting up mine so, I would like to lessen the burden for other devs trying to set theirs.
You're ready right? let's get to work.
- Create a project - Create a folder and move to the root folder.
mkdir node_typescript

cd node_typescript
- Configure and Add Dependencies - You will need to add some node dependencies that will make TypeScript and express work hand in hand.
npm init -y
npm install  express mongoose dotenv cors helmet express-async-errors --save
npm install  typescript @types/node @types/cors @types/express @types/mongoose ts-node ts-node-dev --save-dev
tsc --init
The first command npm init -y initializes a node project, and create a package.json for us so that we can add some npm configurations to it.
The second command installs the express and mongoose package to be our core dependency, while the third command installs the typescript @types/node @types/express @types/mongoose ts-node ts-node-dev as a dev dependency.
I want to point out that the packages starting with @types are just there for the TypeScript support. Those packages didn't have TypeScript support at first, so, if you are going TypeScript in your node project, you need to add them as your dev dependencies. Most new packages now have TypeScript support, so we won't need to be adding these extra packages. Also, the old packages are being refactored to have TypeScript support in a go. So, we might not need to be adding an extra dependency in the future.
- Get the project structure
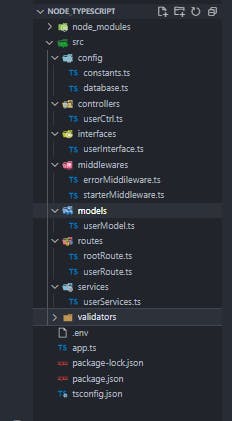
Create a folder called src and then create subfolders by name config, controllers, interfaces, middlewares, models, routes, services and validators. We want to separate concerns, so I find it cool to have this kind of architecture whenever I want to build an API.
In the subfolders, create files as the image below. This is how the folder structure will look like 👇.
 In the tsconfig.json, uncomment the outDir property of the compilerOptions edit as follows
"outDir": "./dist"
This makes all the project structure to appear in a dist folder when we build our TypeScript project.
Also, in the package.json, configure the script property as follows;
{
  "name": "node_typescript",
  "version": "1.0.0",
  "description": "",
  "main": "index.js",
  "scripts": {
    "dev": "ts-node-dev --respawn app.ts",
    "start": "ts-node  app.ts",
    "build": "tsc"
  },
  "keywords": [],
  "author": "",
  "license": "ISC",
  "dependencies": {
    "cors": "^2.8.5",
    "dotenv": "^10.0.0",
    "express": "^4.17.1",
    "express-async-errors": "^3.1.1",
    "helmet": "^4.6.0",
    "mongoose": "^5.13.5"
  },
  "devDependencies": {
    "@types/cors": "^2.8.12",
    "@types/express": "^4.17.13",
    "@types/mongoose": "^5.11.97",
    "@types/node": "^16.4.12",
    "ts-node": "^10.1.0",
    "ts-node-dev": "^1.1.8",
    "typescript": "^4.3.5"
  }
}
The npm package ts-node-dev helps to restart the server whenever we have any change in any file while working on our project.
Yea, let's start writing TypeScript, shall we? 🥰
Now, in the app.ts file, add the following lines of code.
The app.ts file
import * as http from 'http'
import dotenv from 'dotenv'
import express from 'express'
const app = express()
const server = http.createServer(app)
require('express-async-errors')

dotenv.config()


import starterMiddleWares from './src/middlewares/starterMiddleware'
import  constants from  './src/config/constants'
import database from './src/config/database'
import errorHandler from './src/middlewares/errorMiddileware'
import apiRoutes from './src/routes/rootRoute'

starterMiddleWares(app)

//endPoint
app.use('/api', apiRoutes)


// Error Middleware
app.use(errorHandler)
const port  = constants.PORT || 2021
server.listen(port, () => {
    database()
    console.log(`Listening on port ${port}`)
})

server.on('error', error => {
    console.log(`Error occured on the server ${error}`)
})
Here we made a few imports of packages. We are no longer making use of require, which is the traditional way of making imports in node. TypeScript uses the ES6 syntax of import. so we use the keyword import to import any package we want.
We loaded out environmental variables with dotenv package which helps to load environmental variables before the server starts. Also, we used express-async-errors to handle our asynchronous code while using async-await. It helps us to keep the code clean by removing try-catch blocks from our code.
Detailing the config folder
- constants.ts file
const  constants = {
    PORT : 6000,
    DATABASE_URI: process.env.DATABASE_URI
}


export default constants
Here, we just added the constants that we need to get the app up and running which is just the port and DATABASE_URI which we are expecting to add in our .env file.
- database.ts
import {connect} from "mongoose"
import constants from './constants'


function database(){
    connect(constants.DATABASE_URI!, {
        useCreateIndex: true,
        useNewUrlParser: true,
        useUnifiedTopology: true
    })
    .then(() => {
        console.log("Connected to mongoDb")
    })
    .catch((err: Error) => {
        console.log("There was an error while connecting to the database.")
    })
}

export default database
Here we exported a function that helps run the connection to MongoDB based on the URL supplied in the .env file. It could be a local connection to MongoDB compass or to MongoDB atlas. If we are having connection issues, it gets to the catch block. So we can even log the error. But here, I just made a log statement to notify the developer that there was an error connecting to the database.
controllers
- userCtrl.ts
import express from 'express'
import UserServices from '../services/userServices';

class UserCtrl{
    async addUser(req: express.Request, res: express.Response){
        const userData = req.body;
        const response = await UserServices.addUser(userData)
        res.send({
            status: true,
            message: "User created successfully",
            data: response
        })
    }
    async fetchUsers(req: express.Request, res: express.Response){
        const response = await UserServices.getUsers()
        res.send({
            status: true,
            message: "User created successfully",
            data: response
        })
    }

    async loginUser(req:express.Request, res: express.Response){
        const loginDetails = req.body
        const response = await UserServices.login(loginDetails)
        res.send({
            status: true,
            message: "User loged successfully",
            data: response
        })
    }
}

export default new UserCtrl()
Yea, it is TypeScript, we have to specify the type of Data that we are expecting so that we can make a better reference to it. Here, you see that we imported express so that we can use it to reference the type of data that is contained in the request object. So, the req: express.Request and res: express.Response is informing TypeScript of the type of data that it should be expecting from the req and res parameter. This is just the difference while using Node and Node + TypeScript. Now, if you want to access a property that is not in the request object, you will get an error from TypeScript informing you that there is no property of such in the request object. That is the goal yea? Nice! We imported the userServices and make calls to it to perform the operation we want. It returns a response, which we are sending as the response to the request. We then export an instance of the UserCtrl class.
interfaces
- userInterface.ts
interface AUser extends Document{
    email: string,
    firstname: string,
    lastname: string,
    password: string,
    fullname: string,
    _doc: any
}

interface UserLogin{
    email: string,
    password: string
}


export {
    AUser,
    UserLogin
}
Here, we exported a couple of user interfaces. The first, which is the AUser, is just describing how our mongoose document should be. This interface extends the mongoose Document interface. It helps so that it will have the default mongoose properties while adding our custom model.
The other is the UserLogin, we are just typing the data that will be supplied by the body to us while using the login route. Lastly, we export the two interfaces.
middlewares
- errorMiddleware.ts
import express from 'express'


const ErrorMiddleware = function (error: Error, req: express.Request, res: express.Response, next: express.NextFunction) {
     res.status(500).send({
         status: false,
         message: "An error occured",
         data: error.message
        });
};

export default ErrorMiddleware
This is the error middleware. Since we are using express-async-errors, whenever we have any error, in our application, it falls back to this middleware. We then give a response. Notice that the parameters are also typed.
- starterMiddleware.ts
import cors from 'cors'
import helmet from  'helmet'
import  express from  'express'


export default  function(app:  express.Application){
    app.use(cors())
    app.use(helmet())
    app.use(express.json())
    app.use(express.urlencoded({extended:false}))
}
This is the application default middleware which we often use in node. I tried abstracting them so that our app.js file will be neater. You will also see that there is an Application interface in express which entails the type of data that we expecting in the app parameter. Cool yea ? You will definitely fall in love with TypeScript with all these mechanisms.
models
- userModel.ts
import { Schema, model, Model } from "mongoose";
import { AUser } from  "../interfaces/userInterface"


const UserSchema  = new Schema<AUser>({
    email: {
        type: String,
        required: true
    },
    firstname: {
        type: String,
        required: true
    },
    lastname: {
        type: String,
        required: true
    },
    password: {
        type: String,
        required: true
    }
})

const UserModel:Model<AUser>  = model("User", UserSchema)

export default UserModel
Take a closer look at how we created our mongoose model. It has generic typing. In the declaration of the UserSchema, it is just saying that this is a mongoose schema, but this schema should be shaped like that of the AUser Interface. Also, while building the model, we are also saying, model this schema so that it looks like that of the AUser interface.
rotues
- rootRoute.ts
import express from 'express'
import userRoute from './userRoute'

const router = express.Router();

router.use('/users', userRoute);


export default router
Nothing much is going on here, just added our root router. which will be helping with other sub-routes.
- userRoute.ts
import express from 'express'
import userCtrl from '../controllers/userCtrl'

const router = express.Router();

router.use('/addUser', userCtrl.addUser)


export default router
This is the user route. We just added the addUser route for simplicity.
services
- userServices.ts
import { AUser, UserLogin } from '../interfaces/userInterface';
import UserModel from '../models/userModel';


class UserServices{
    async addUser(userData: AUser){

        // Check if the user exists
        const existingUser = await UserModel
            .findOne({email: userData.email})

        // Throw error if there is any
        if(existingUser) throw new Error("User already exists")

        // Create a new user since there are now no duplicate
        const newUser = await UserModel.create(userData)

        return newUser
    }
}

export default new UserServices()
This is the user service that contains a class with one method that adds the user. You can also notice that the parameter in the method is typed. It is expecting data the same as that of the AUser interface.
.env file
DATABASE_URI=mongodb://localhost:27017
After adding all of these, you will need to run that app using the command;
npm run dev
Here is a link to the github repository: https://github.com/Vicman2/Node_TypeSript_Starter_Guild
Quick Takeaway: Whenever you are stuck in a TypeScript project while typing it, always use any to get away from the mess. You can always come back to type it the perfect way. Do not overuse the any keyword because using any all over the codebase is the same as running plain javascript which now defeats the purpose of TypeScript.
Always reach out to me if you encounter any problems while setting up yours.